Batteries
Everything you need to know about batteries.
Electric Golf Carts rely on batteries for power. The batteries are the brains of your electric golf cart and they need to be properly maintained in order for your cart to run smoothly and prolong its lifespan. A little proactive maintenance can go a long way to extend the life of your batteries, reducing the need for repairs, and even optimizing your cart’s performance. Neglected batteries are the most frequent source of problems for electric golf carts. Knowing the importance of golf cart battery maintenance is one thing and what other tasks you can handle yourself is another. We highly recommend that regular inspections and tests be done on your cart’s batteries to be sure that they’re in top shape.
The two most common types of batteries used in electric golf carts are deep cycle and lithium-ion.
Deep cycle batteries are made up of two cells with lead plates and lead oxide, and they’re maintained by a water and sulfuric acid solution which together produce an electrical current. These types of batteries are the most cost effective choice for electric carts but they require routine maintenance and they also consume a considerable amount of distilled water over their lifetime.
In addition to being much lighter than regular deep cycle batteries, Lithium-ion batteries deliver large amounts of current for high-power applications. Li-ion batteries are also comparatively low maintenance, and they don’t require any scheduled cycling to maintain their battery life. Li-ion batteries don’t exhibit any memory effect. Memory effect is a detrimental process where repeated partial discharge and charge cycles can cause a battery to ‘remember’ a lower capacity. Since the Li-on batteries don’t exhibit this issue, it’s an advantage over both Ni-Cad and Ni-MH, which both display this effect. Li-ion batteries also have a low self-discharge rate of about 1.5-2% per month. They don’t contain any toxic metals or chemicals like cadmium, which makes them easier to dispose of than Ni-Cad batteries too.
Don’t Neglect Your Batteries
It’s important to note that as the water in a battery helps conduct the electrical current away from the inside of the battery, it’s also subjected to the chemical process that creates the electrons in the first place.
This causes the water to go through some changes as well. Usually, these changes cause the water to evaporate, ultimately depleting the amount of water in the battery. With less water in the battery to carry any current, the battery doesn’t perform as well as it should.
Although tap water will replenish the battery and keep it up and running, it also contributes to its wear and tear. Certain substances in the water will affect the chemical processes that are already happening inside the battery.
Water that comes from your faucet and other home sources is loaded with minerals. These could be minerals coming from your plumbing system as well as the local water treatment facility in the area. This kind of water can slow down your battery’s performance over time.
This is because the minerals in the water get left behind after it evaporates from inside the battery. When the water evaporates, mineral traces like iron and calcium don’t evaporate with the water. They get left inside the battery leaving scaly deposits.
On the other hand, distilled water doesn’t have the same problem as tap water. That’s because distilled water doesn’t carry enough substances to affect the durability of the battery. It’s pure enough and doesn’t affect the chemical processes that need to take place to produce current.
When you use distilled water for your battery’s water, it doesn’t leave anything behind when it evaporates. Every other contaminant in the water evaporates as well, with nothing significant except water vapor. That means there won’t be any minerals left behind to affect the chemical processes inside the battery.
What you get is an efficient battery with battery water that’ll work without fail. You’re also left with a healthy battery that doesn’t deteriorate as much as a battery that’s topped off with tap water.
Take the following steps to avoid damage and maximize the life of your batteries:
- Charge the batteries after each use. Never leave your batteries discharged overnight or longer than is absolutely necessary.
- Unless the electrolyte level is below the top of the plates, charge the batteries before adding any distilled water. If you DO need to add water, add just enough to cover the plates. Then charge the batteries and check the level again. Don’t ever charge the batteries when the plates are exposed above the electrolyte level.
- To maximize the life of your batteries, add or refill them with distilled water only. Don’t overfill the batteries. Fully tighten the battery caps when you’re done filling the cells to prevent any electrolyte leakage.
- If your vehicle isn’t equipped with the single-point watering system, try to check your electrolyte level weekly and add water if needed.
- If your vehicle is equipped with a single point watering system, water the batteries monthly or according to whatever watering interval you’ve established, following the instructions in your owner’s manual.
- Make sure the battery hold-downs are tight enough so the batteries don’t move while the cart’s in motion. Just be sure that you don’t over-tighten them, as this can cause the battery case to crack or buckle.
- Inspect the terminal connections regularly to be sure that they’re clean and tight. Replace any worn insulation or frayed wires if you see anything that looks suspect.
- Keep the batteries clean and free of corrosion by washing the tops and terminals regularly. Use a solution containing one cup of baking soda mixed with a gallon of water. Make sure not to let the solution enter any of the cells and be sure to thoroughly rinse it off all the batteries. Fully tighten the battery terminals and let them dry, then coat them with Battery Terminal Spray.
Battery Replacement
When it is time to replace your batteries, it’s best to replace all of them at the same time. If you put a new battery in with an older pack of batteries, the old batteries will reduce the life of the new battery. Since the older batteries take longer to charge, the new battery gets overcharged and damaged.
Battery Testing
A hydrometer is recommended for testing the state of charge for each battery cell. The hydrometer measures the density of the electrolyte by way of its gravity. A higher specific gravity indicates a denser electrolyte and a higher state of charge.
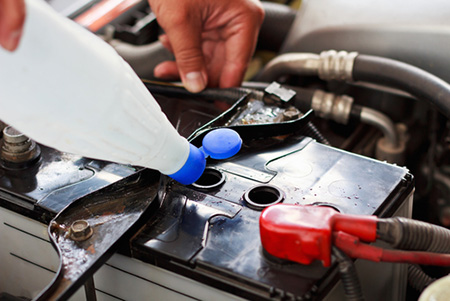
Battery Watering
Golf cart batteries need the correct level of electrolytes to properly perform the chemical process of creating electricity. The solution that creates electricity consists of electrolytes and water. Batteries consume a considerable amount of water over their lifespan due to the charging process.
Overfilling or having too little water in your battery cells can negatively affect the batteries. Too much water will cause the electrolytes to overflow during the charging process. To prevent overfilling, use a golf cart battery watering system or a watering gun. Both options are fast and accurate because they automatically stop filling the batteries when the appropriate level is reached.
Too little water in the battery will cause sulfation, which is a direct result of the lead plates not being completely covered by water during the charging process. Sulfation will cause permanent damage to the lead plates.
The best time to fill the cells up with water to the correct level (½” above the plates and ¼” to ⅜” below the vent) is after the batteries have been charged. The charging process increases the electrolyte level, and that’s why it’s best to add water to the correct level after charging. The exception is when the plates aren’t covered by water.
In that case, add just enough water to cover the plates, charge the batteries fully, and then continue to add water to the correct level. Do NOT use regular tap water to fill your batteries. It contains contaminates that can cause damage. Distilled water is always recommended.
Neutralizing Battery Acid and Cleaning
During a charging cycle, your batteries release hydrogen gas, water, and acid droplets into the air that eventually find their way onto other components. If you don’t address it, those droplets will cause damage to the frame and anything else they touch. Before working on the batteries, use a battery acid neutralizer and remove any battery corrosion on the batteries by spraying them with the following mixture of sodium bicarbonate and water.
Simply mix a cup of baking soda with a gallon of water.
Then, using a cloth or sponge, apply the mixture to the affected area.
Leave it sit for about 10 minutes, then rinse it away with clean water.Steps for neutralizing and cleaning your batteries:
- Cover other electrical components before you spray and clean them.
- Make sure all of the vent caps are closed tightly.
- First, neutralize and allow the mixture to sit for at least 3 minutes.
- Use a cloth or soft bristle brush to wipe down the batteries (top and sides).
- Rinse the batteries off with clean water to remove the neutralizing solution.
- Dry with a cloth.
- Clean the battery terminals with a battery post and terminal cleaner.
- Spray the terminals with a battery terminal protector.
- Reconnect the battery terminals.
-
Battery Charging
Proper charging is necessary for optimal battery performance and longevity.
Tips for safely charging a deep cycle battery:
- Read the battery charger manual
- Recharge the batteries after every use. Batteries last much longer if you use the top half of the battery charge rather than over-discharging the batteries
- Use a heavy-duty 15-amp charging cord
- Charge the batteries in a well-ventilated area. Lift the seat for best ventilation
- Inspect the charger connections for debris, dirt, and fraying wires
- Make sure the lead plates are submerged under the water
- Don’t add water to the correct level before charging
- Make sure all the vent caps are tight
- Make sure the charger connector is firmly connected to the receptacle
- If you suspect your charger isn’t working properly, take it to a professional
- Troubleshooting a possible bad battery charger can be pretty difficult
-
Deep Cycle Batteries
While they have the same appearance as the shallow cycle batteries (starting, lighting, ignition) found in a regular car, golf cart batteries are significantly different.
Deep cycle (flooded or wet) battery characteristics:
- Contain electrolytes made up of a lead, acid, and water solution
- Produce an electrical current for long periods of time
- Require routine maintenance to maximize battery life
- Consume a considerable amount of water over their lifespan
The shallow cycle batteries (SLI) found in a car produce a high current of electricity for a short period, required for starting the engine. SLI batteries can’t be used to replace the shallow cycle batteries in a golf cart.
Shocks
Is the rear end or front end of your cart sagging? Is your cart extra noisy when you go over bumps or even when you’re driving around gently? Chances are your suspension parts are getting old. Just like in your car, your shocks, suspension and leaf spring parts wear out over time due to use and age…..also known as usage. Get it?
Your cart utilizes shock absorbers and/or leaf springs to soften the ride quality over the bumps of rough terrain just like your car does. Heavy duty shocks or leaf springs are recommended if you experience suspension sagging that’s causing your wheels and tires to rub inside your wheel wells. Sometimes, a lift kit by itself isn’t enough to prevent tire rubbing if your suspension is old. Heavy Duty golf cart shocks can boost-up your front end 1-2 inches over the original shocks. New shocks on your old cart can help bring it right back to life, restoring the factory ride quality you’ve been missing out on. They’ll also beef up your cart’s ability to tackle harder terrain.
Clutch
All gasoline powered golf carts have a clutch, which is the part of the drive-train that helps put the power of the motor to the wheels, much like in your car. Many newer golf cart clutches are a part of a Continuously Variable Transmission (or CVT). This type of transmission is comprised of two different clutches connected together by a drive belt. The two clutches are the:
- Drive Clutch (Primary)
- Driven Clutch (Secondary)
The drive (primary) clutch connects to the engines crankshaft while the driven (secondary) clutch is bolted onto the cart’s input shaft. The Drive Clutch & Driven Clutch work in tandem to move your cart when you step on the accelerator pedal. These same clutches also help with smooth deceleration when the cart’s in motion and the accelerator is released even if the brake pedal isn’t depressed.
Three things can indicate that your golf cart clutch is going bad:
- Your cart’s initial acceleration is jerky.
- It feels like the power is slipping while your cart’s climbing an incline or on any rough terrain or hills.
- Your cart has a varying top-end speed that alternates between fast and slow.
Controller
Controllers are an extremely popular part to either replace (due to age or malfunction) or upgrade for your golf carts power. The golf cart controller does exactly what its name implies: it controls the power and speed of your cart.
If you’re looking to either replace or upgrade your controller, the most important thing you can do is think about how your cart gets used the most. Figuring out your demands will tell you how much power you need out of your controller (and motor):
- 200-300 Amp Controller: Perfect for your cart if it’ll be used for normal rounds of golf or trips around the neighborhood with up to two passengers
- A Controller this size is normally paired with a small 2hp to 5hp motor
- This is the typical controller size on 36-Volt Golf Carts
- 300-600 Amp Controller (upgraded): Great for carts with a rear seat or cargo bed, or carts that’ll need to climb steep hills. When you’re carrying 4 or more passengers/heavy loads, or climbing a steep grade, an upgraded controller (and motor) is recommended.
- A Controller this size is normally paired with a larger 5hp to 10 hp motor
- Typical controller size of 36-48 Volt Golf Carts
Solenoids
Solenoids act like a relay/switch between your golf cart batteries and your golf cart starter/generator or motor. Think of the solenoid as a gate keeper of the battery current. It allows (or disallows) the current to flow through to your cart’s starter/generator to start your engine (on gas carts). On electric carts it functions the same way, except that the solenoid allows or disallows the current to flow to the controller/motor instead of a starter.
Solenoids used in golf carts are designed to work the entire time you have the pedal down when you’re accelerating/driving. This means that the solenoids work hard all the time; so they tend to go bad. Luckily, they’re inexpensive and we carry replacement solenoids for all types and brands of carts.
Frequently Asked Questions
Gas Golf Cart Maintenance Checklist
The general inspection of your engine and the associated maintenance requires special tools and a basic knowledge of a small engine tune-up.
- Always inspect the engine for any signs of oil leaks
- Check the engine oil level regularly and be sure to change it at the proper intervals
- Check and adjust the valve clearance on any motor that will allow the valves to be adjusted
- Inspect the drive, the starter, and the generator belts for any excessive wear or defects. Replace any of them if it’s needed
- Check the starter belt tension. Tighten it if needed
- Inspect the linkages from the accelerator pedal to the carburetor
- Check the engine compression (this procedure will require an engine compression tester)
- Check the spark plug for wear or needed replacement
- Clean or replace the air filter
- Replace the oil filter
- Check the fuel filter for debris or needed replacement
- Look for starter/generator brushes wear. Replace if needed
- Check the points and condenser on older models. Replace if needed
- If the engine is running rough, check and adjust the timing, as needed (EZ- Go Example)
- Always inspect, test, and maintain your batteries as is recommended for an electric golf cart.
Engine Compartment Access
You’re gonna find the access to your cart’s powertrain by removing the seat. Depending on the model and the access you need, you may also need to jack up your cart too.
Checking the Oil Level
This description is for an EZ-GO engine.
Always check the oil when the engine is warm and your cart is parked on a level surface. When you check your oil, remove the
dipstick and wipe the oil off with a lint free cloth. Reinsert the dipstick into the engine and remove it checking the oil level that’s
now showing. If it’s low, add more oil until the level is within the ideal range.
Changing the Oil
To get the best from your cart you should regularly change your engine oil. When your cart’s brand new, you should replace the oil after the first 100 hours.
After the first oil change you should replace the oil every 125 hours or every six-months, whichever comes first. If you’re a snowbird and store your cart for
the summer, change your oil every season. Simple.
When most carts are new, they initially require 10W-30 engine oil for a break in period, then use 10W-40 after the first oil change.
To properly change your oil, follow the steps outlined below:
- Park your cart on a level surface and secure it from any movement.
- Place a sump or drain pan under the engine.
- Remove the oil filler cap.
- Take out the 3 bolts that secure the oil filter.
- Allow enough time for the engine oil to drain into the sump.
- Be sure to fill the new replacement filter with oil, and coating any associated gaskets or o rings with oil as well before installation.
- Fit the new filter to the engine and secure the 3 bolts,
- Refill the engine with oil. Total capacity is 1.4L, or about 1.5 quarts.
- Replace the oil-filler cap.
- Start the engine for about 1 minute, shut it down and check your oil level following the procedure outlined above.
Valve Adjustment
Your valves should be checked annually (depending on your use, about 250 hours) to be sure they stay adjusted correctly. Valves that are adjusted incorrectly will cause wear to the cams and rocker arms.
Additionally, your engine will clog or foul the spark plugs and it’ll perform poorly if the valves aren’t positioned correctly.
Adjustment Procedure
Your valve clearances can be set at the top of the engine. Be sure and always adjust these setting when the engine is cold. Remove the rocker cover and slide a 0.004” (0.10mm) feeler gauge (flat) between the valve rocker and the cam’s heel. The feeler should slide in and out with only a little resistance. If it’s hard to slide the feeler in or not insert it at all, the valve is too tight and requires some adjustment. If the feeler is sloppy and the gap’s too big, the valve is too loose and requires some adjustment. To adjust the valves, loosen or tighten the adjuster nut with a wrench and adjust the valve clearance using a straight head screwdriver. Check the gap with your feeler gauge and readjust it if necessary.
Manually rotate the engine by hand to reposition the next valve to check.
.
STARTER/GENERATOR BELT TENSION
When your cart’s new you should check the belt tension after the first 15-20 hours of use. The belt should be set to about 75-80lbs (34-36KGs). When replacing a belt, always be sure to tighten it between 90-110 lbs. (41-50KG) of tension. You can measure this by placing a feeler gauge half way between the 2 pulleys.
If you don’t have a feeler gauge you can press down on the belt with your finger where you should see a maximum deflection of about 3/8″ (10 mm) which is OK. This method isn’t real accurate but it’ll work in a pinch.
If you’re tightening an existing belt, adjust it to between 75-80 lbs. (34-36 kg). The maximum deflection that’s allowed is 1/2″ (13 mm).
Adjusting the Belt
To adjust the belt use a 3/4″ socket and an open ended wrench. Loosen the starter motors pivot bolt. Hold the lower nut (Adjusting Nut) with a 9/16” wrench and loosen the upper nut (Jam Nut) with another 9/16” wrench. You can then raise the lower nut up or down to adjust the belt tension. When you get the tension where you want it, hold the lower nut and tighten the Jam Nut.
When you’re done with this procedure, don’t forget to tighten the pivot bolt of the starter motor.
COMPRESSION TESTS
It’s important to do your best to perform a quality compression test:
- Remove the clutch belt
- Remove the air filter
- Make sure that the battery’s fully charged
- Make sure that the starter belt has the correct tension and it isn’t worn causing any slippage
- Open the choke fully and the accelerator baffle plate
- Be sure that the engine’s warm
- Removing one spark plug at a time fit your compression tester to the engine,
- Perform a dry compression test by rotating the engine with the starter until the gauge pressure peaks
- Record the gauge reading
- Next do a wet compression test by pouring 1/2 ounce of 30-weight oil through the spark plug hole
- Repeat the compression test
- Record the gauge reading
- Compare the dry test with the wet test results.
Note: A wet compression test with higher results means poor ring sealing or a leaking head gasket. If both results are the same then you have an indication of valve seal problems.
Your engine should increase 20lbs. above the rated PSI for an engine with seated rings. Compression readings that are 20lbs. below the rated PSI for an engine means poor cylinder sealing.
160 psi (1103 kPa):
New Engine
140 psi (965 kPa):
Good Compression
100 psi (690 kPa).
The engine has obviously experienced many hours of use and it’s starting to exhibit low compression. If you’re planning on keeping the cart, an overhaul of the top end should be considered. The engine will eventually start to burn oil and produce some black exhaust fumes with a bluish tinge.
50 – 60 psi (345 – 415 kPa).
Either the piston rings are in terrible condition or the valves are leaking. To be sure, conduct a wet compression test. If the compression increases to 10psi (70kPa) or more then the rings are in bad condition. If there’s no increase in compression, then the valves are leaking. If the rings are in poor condition, the engine will be burning oil and producing black exhaust fumes with a bluish tinge.
SPARK PLUGS
Remove the spark plugs every 250-300 hours or annually, whichever comes first. To remove the spark plugs use a 13/16″ spark plug wrench. Check the gap on the new plugs with a feeler gauge. A 295cc motor requires a .035″ or 0.9mm Gap. The 350cc motor requires a .028″ – .032″ or (.70 -.80 mm) Gap. Install the new plugs and tighten them to 18 ft. lbs. (24 Nm).
AIR CLEANER INSPECTION/REPLACEMENT
The air cleaner is fitted to the engine and can be found by raising the seat of your cart.
Give the cover, canister and dust cover a good cleaning and a refit. Make sure that the arrow is pointing up and fasten the clips securely.
Cleaning the Air Filter Element
If you find that the air filter element is in poor condition, you should replace it and refit the clips appropriately.
Timing Belt Adjustment/
Check the timing belt tension every year by removing the rubber plug in the timing belt cover. This will allow access to the idler pulley bolt. Loosen the bolt with a ¼” wrench and manually rotate the engine one turn allowing the belt to tighten. Adjust the idler adjustment nut to 10-13ft. lbs. (14-18Nm). Reinsert the rubber plug.
COOLING SYSTEM CLEANING
First off, never work on a hot engine, always be sure that it’s cool.
You should try to clean the cooling system once a year. The internal shroud and fins can become clogged with dirt, grass or other debris which can cause a breakdown of the cooling system efficiency.
To clean the cooling fins and shroud you can freely pressure wash around the cylinder head and cooling fins. When you’re done, you can dry it with compressed air.
Rocker Cover Installation
Check the O-ring for damage and replace it if you find any. Reposition the rocker cover gasket in the housing groove and apply a light coat of oil with your finger. Install the rocker cover gasket and finger tighten the bolts. Sequence tighten the bolts to 60-65in.lbs. (7Nm) to be sure that you don’t distort the cover.
ENGINE REMOVAL
Safety
- Isolate the battery,
- Remove the fuel pump line and plug it off.
Skid Plate Removal
To remove the skid plate, cut the wire tie that secures the shift cables and remove the 4 bolts securing the bottom engine plate.
Controls and Wiring
- Disconnect the wiring harness and cut the wire tie that holds the accelerator cable
- Disconnect the choke cable and remove the push nut on the governor
- Disconnect the fuel pump pulse line
- Disconnect the engine’s ground strap
- Slacken the starter motor and remove the starter belt
- Disconnect the short control rod and short rod from the bell-crank and governor
Removing the Engine from the Vehicle
- Loosen the bolt holding the muffler to the engine frame
- Disconnect the 4 bolts that hold down the engine to the support casing.
- Raise the engine and clutch vertically with some type of appropriate lift gear
DRIVE CLUTCH REMOVAL
- Disconnect the clutch bolt
- Fit a lubricated clutch puller into the clutch and tighten it 4 turns.
- Disconnect the clutch with an impact wrench
STARTER MOTOR REPLACEMENT
- Disconnect the wiring from the starter motor
- Loosen the jam nut and the adjustment nut and move the starter motor adjuster until the starter belt is able to be removed from the clutch.
- Disconnect the starter motor pivot bolt and raise the starter motor from the cart.
- Fit the starter motor pivot bolt loosely in place and install a new starter belt
- Fit the nut securely and torque the pivot bolt to 44-46 ft. lbs. (60-62 Nm)
- Fit the wiring, and torque the terminals firmly in place.
- Reconnect the battery.
ENGINE ISOLATION MOUNT REMOVAL
- Remove the floor mat and remove the cover for the accelerator switch enclosure.
- Place a jack under the engine skid plate and jack it up to take the load off of the isolation mount.
- Remove the isolation mount bolt.
- Remove the nuts that connect the isolation mount bracket to the cart’s frame.
- Disconnect the isolation mount bracket and pull apart the mount.
Engine Isolation Mount Installation
- Follow the reverse order of “Engine Isolation Mount Removal,”
- When reconnecting the isolation bracket to the cart’s frame, torque the nuts to 21-25 ft. lbs. (28-34 Nm).
MUFFLER REMOVAL
- Remove the bolt that fits the muffler to the engine frame,
- Remove the muffler to the manifold mounting bolts and remove the muffler by rotating it vertically through the engine’s compartment.
Muffler Installation
- Follow reverse order of “Muffler Removal,”
- Install a new gasket and torque the manifold bolts to between 16-18ft. lbs. (22 – 24Nm).
- Torque the muffler to the engine frame to 10-12ft. lbs. (14-16Nm).
Motors, motors, motors.
Let’s talk about some electric motor maintenance.
Most permanent magnet DC-powered electric motors use brushes, which aren’t REALLY brushes they’re just called brushes, to transmit power from the source (battery) to the commutator. The power then continues to the rotor that is wound with conductive wire, producing a strong magnetic field that’ll repel the magnet facing it on the inside of the motor case. This is what makes the rotational torque that powers your cart.
One of the disadvantages of using a brushed DC motor is that eventually the brushes wear down and they need to be replaced, similar to how disc brake pads wear out on your car.
In most cases, the brushes will last a REALLY long time in a properly maintained DC motor. Things that can cause excessive and premature wear include running the motor too fast, applying more power (either voltage or current) than the motor’s specified for, putting an excessive load on the motor, and harsh conditions like sand, water, or dust around the motor. Inspecting and cleaning the motor and brushes occasionally with compressed air will help your motor last for a long time.
To inspect the motor, the first thing to do is to remove the battery cables from the battery bank. Lift the rear of the cart (after blocking the front wheels). Remove the gold-colored band on the rear of the motor (it has a latch and removes easily). Pull back on the spring covering the brush and pull the brush assembly from the motor. It’ll still be attached by a heavy wire. Inspect the brushes for cracks and excessive wear.
After removing all four brushes, blow out the motor with compressed air, and then inspect the commutator. It should be smooth all around and really shiny.
If the brushes need to be replaced, simply take out the bolt holding each brush wire; remove it and replace with a new brush.
Next you’ll have to clean up the commutator. It usually looks black and nasty when the brushes are removed. Use a piece of 280 grit sandpaper and hold it in place while a friend spins the motor with a wrench or a power drill. Work your way up to at least 400 grit paper and continue until the commutator looks shiny. Then you can break in the motor. Here’s what you need to do.
- Make sure there’s no load of any type on the motor (disconnect the transmission or differential.)
- Run the motor at about ¼ to 1/3 throttle for about 20 minutes. Be sure it’s in the direction that the motor turns when going forward.
- Look through the rear vent and check for any excessive arcing inside the motor while it’s running.
- Now run the motor at about 2/3 to ¾ throttle from about 10 minutes to maybe an hour.
- Again, look through the rear vent and check for any excessive arcing inside the motor.
- Re-connect the drive train and drive the cart a little gently for the first couple of charge cycles.
Hopefully, this helps in any motor repairs you may have to fix either now or in the future. It’s much easier than you might think– it just takes some time.
Tires
Always check your tires regularly to maintain the recommended pressure listed by the manufacturer. You’ll find the recommended pressure on the tire’s sidewall. Partially deflated tires use more energy, reduce the cart’s range, and wear the tires out faster. Your carts’ tires should be checked according to a periodic service schedule. Always check the pressure when your tires are cool and not after you’ve been driving around and they’ve had a chance to warm up. When you’re inflating the tires always be careful and respect the pressure. Remember this, your cart’s tires are small, and they don’t require a lot of air volume, so over-inflation can occur very quick. Too much pressure in your tires can cause the tire to separate from the rim, which can cause a sudden explosion resulting in injury to yourself and anyone else around you. Not a good thing. The terrain you drive on should dictate the level of air pressure you fill your tires with. On hard surfaces you should have slightly higher pressure. On the flip side, soft surfaces will do better with a lower tire pressure because it increases the width of the tire contacting the surface giving you better traction. Make sure that you don’t exceed the pressure identified on the tires sidewall. Also be sure that all four tires have the same air pressure and be sure to install the dust caps back on the tires after you fill them. If you need to replace your tires, remember that if you use your cart mainly on the streets, buy some street-legal tires with a good tread. Balloon or Turf Tires will wear out sooner and they don’t stop very well on wet roads either.
Tire Repair
Your cart is typically provided with low pressure tubeless tires mounted on a single one piece rim. If needed, use an impact driver or lug wrench to remove your wheels. The most cost effective way to repair a flat tire is to use a commercial tire plug. If you find one of your tires flat, remove the tire, inflate it and dunk it in a container of water. Rotate it around in the water until you see air bubbles leaking out from the tire, and mark it with some chalk. Using a tire repair kit, fit a commercial tire plug to repair the puncture. Done.
Wheel Installation
When you’re mounting your tires/rims back on your cart, be sure that the valve stem is always on the outside of the wheel. Fit the wheel to the carts hub and finger tighten the nuts. If you have a ratcheting torque wrench, tighten the nuts to 50-85ft. lbs. (70-115Nm) making sure to follow a cross sequence pattern.
Brake Service
The standard golf cart brakes that come pre-installed on your cart are the rear wheel drum brakes. Depending on the cart that you have, you may have either mechanical brakes or electric brakes. Since golf carts don’t go exceptionally fast, they usually only need brakes on the two rear wheels. The typical maximum speed of a golf cart is about 12 miles per hour. When your cart drives at a standard speed, the rear brakes don’t need to exert much effort in order to stop. Like a car, your golf cart’s brakes eventually need to be replaced. Over time, they can get worn down, causing them to struggle to make your cart stop. No matter if you take your cart off-road, around the neighborhood, or on the golf course, you need to make sure you have functional brakes.
1. Inspection of your brake pedal return bumper.
Be sure that the brake pedal meets the pedal return bumper when it’s disengaged. The bumper should be in good condition with a 1/4 – 3/8″ space between the setscrew heads of the kick-off cam and the brake pedal arm. If necessary, replace the brake pedal system.
2. Inspection of brake pedal return.
Engage the brake and release it. The brake pedal arm should contact the pedal bumper when it’s disengaged. The torsion spring should be wrapped around the pedal and the frame. If the pedal has a slow return or it doesn’t return home fully, then the bushings and pivot bolt need to be replaced. If necessary replace the spring, bushings and the hold down bolt.
3. Inspection of the brake pedal for free travel.
Check to see that the brake pedal has free travel at the point where the brake shoes first come into contact with the brake drum. If you have too much free travel, then you have inappropriate pedal free travel which means that you have issues with either one of the wheel brake self-adjusters or the brake linkages.
4. Inspection of the brake cables.
Look for any damage or fraying of the inner cable and any lack of smooth motion when the pedal is engaged and disengaged. Check that the cables are correctly positioned within the cable support guides. If you experience any issues, replace both of the cables and equalizers together.
5. Inspection of the brake cable equalizer linkage.
Carry out an inspection and look for any corrosion, damage, wear or severe misalignment. Replace any parts as needed.
6. Clevis Pins Inspection.
Inspect the clevis pins attached to the brake lever. The clevis pins need to have some slack when the brakes are disengaged. If the clevis pins are tight and everything else associated with the brake system is working correctly, then the issue is with the wheel brake.
7. Inspection of the compensator assembly.
Carry out an inspection for wear, corrosion and damage of the compensator. Replace it if necessary. Ensure the parking brake is off and then check the compensator spring. The ideal length is 3 15/16” long. If you need to change the length of the spring, do this at the spring’s adjustment nuts near the front of the cart.
8. Inspection of parking brake pedal hinge.
Check for damaged or corroded springs and be sure that the hinge pin retracts properly
Engage the parking brake pedal and check for smooth operation.
9. Condition and operation inspection of the parking brake.
The parking brake should automatically disengage when you step on the accelerator pedal.
10.Inspection of catch bracket and latch arm.
Inspect the catch bracket for excessive wear, damage or corrosion and replace it if any issues are found.
11. Inspect the parking brake kick-off cam.
Look for any wear, damage or corrosion and check for optimum adjustment. Engage the parking brake then check and be sure that there’s no gap between the cam top and latch arm. If necessary, close the gap by adjusting the kick-off cam.
12.Inspection of kick-off cam linkage and bushings.
Inspect the linkage and bushings for wear, corrosion or damage. The pivot cam and the bushings should be free to rotate and they should have no signs of any rust. The kick-off cam should rotate when you step on the accelerator pedal.
Wheel Brake Inspection
Brake Drum Removal and Installation
Remove
- Take off the dust cap.
- Remove the cotter pin and loosen and remove the castle nut.
- Remove the washer and slide the brake drum off the axle shaft.
- If the drum doesn’t come off, the brake shoes need some slack. Take some tension off the cable.
- Turn the hub so that the drum hole is at the 6 o’clock position, above the brake mechanism.
- Using a screwdriver, move the adjuster arm above the star wheel.
- Turn the star wheel to pull back the brake shoes which should allow the brake drum to come off easily.
1. Brake drum cleaning.
Without affecting the adjuster mechanisms, remove any excess debris, dust and dirt from the drum with a brush or compressed air. Wear a mask and avoid breathing in any brake dust.
2. Brake drum inspection.
- Inspect the drum for bluish tinges or blistered paint. This is a pretty sure sign that some overheating has occurred at some point.
- Check for any severe wear which may have scored the drum.
- Inspect the splines for galling.
- In the event of overheating, scoring or galling, you should change the brake drums. Always replace the drums in pairs.
3. Inspect the axle seal and thrust washer for any oil seepage.
4. Inspect the condition and operation of the adjuster mechanisms.
Carry out an inspection of the brake lever for damage and wear.
Carry out testing of the adjuster accordingly to:
- Engage the front brake shoe towards the rear of the cart and hold it.
- Engage the brake lever.
- The adjuster arm should engage the star wheel and start to rotate.
If the adjuster arm engages and rotates the star wheel, then the system is working correctly.
If the adjuster arm fails to engage the star wheel then it’s not operating properly, is likely damaged, and it should be replaced. If you find the need to do this, replace both wheel brake assemblies at the same time.
If the adjuster arm engages the star wheel but doesn’t rotate it, then the adjuster assemblies require replacement.
5. Condition and Operation checks of the moving anchor assembly.
Engage the brake lever checking for smooth motion.
If the moving anchor assembly binds up or is damaged, replace both of the wheel brake assemblies together.
6. Backing plate inspection.
Carry out an inspection for gouges, galling or any damage. Remember that this is the contact point with the brake shoes. It’s important that the backing plate integrity is solid. If it’s not, or if it’s questionable, replace it as needed.
7. Measurement of the brake shoe thickness.
Check the measurement on the brake shoe that shows the most wear. The shoe thickness shouldn’t be any less than .06″ (1.5 mm). If it’s less than .06″ then you should replace both sides.
8. Inspection of the brake shoe springs.
Check the springs for breakage or damage and also if they’re fitted correctly. This description of how the springs should be fitted sounds way more confusing than it really is. The hooked end of the spring is fitted to the front shoe, with the other end fitted to the adjuster. Brake shoes with the light shoe spring near the adjuster, is where the hook is fitted down inside the rear brake shoe and up inside the front brake shoe. The heavy top spring is fitted with all of the spring hooks fitted down inside the brake shoes. It actually sounds way more confusing than it really is.
9. Same procedure for the other wheel brake.
Follow the previous procedure for the other side.
10. Re-Install the Drum
- Clean the axle shaft and splines removing any dirt, grease and debris.
- Use WD-40 or equivalent to prevent seizing on the axle spline.
- Fit the inner brake drum washer and fit the brake drum in place.
- Check that brake drum nose is past the end of the axle splines. If it’s not, use another washer to space out the drum.
- Re-Install the castle nut and a new cotter pin,
- Torque the nut to 80-90ft. lbs. (108-122Nm), and be sure you don’t exceed 140 ft. lbs.(190Nm).
11. Inspect and adjust the brake pedals fluid travel.
Brake pedal fluid travel is the gap that the pedal moves from the stationary position to when the brake cables just begin to engage the brake levers. Adjusting the fluid travel is essential to be certain that the brakes work correctly. If you experience too much pedal fluid travel you’ll have limited braking capacity. If you experience too little pedal fluid travel you’ll cause the brakes to not fully release. This will cause drag and wear and ultimately will affect your speed as well as the life of the brake shoes too.
Adjust the brake pedal fluid travel by loosening the nut and rotating the spherical nut. Torque the nut to 10-11ft. lbs. (14-15Nm). The optimum brake fluid travel setting should be 7/8″ – 1 1/8″ (2.2-2.9 cm).
Press the brake pedal quick and hard 4 – 6 times to find the actual fluid travel. You can conduct a simple test by driving the cart slowly and hitting the brakes quick and hard. Allow the brakes to adjust freely and be sure to repeat this test about 10 times. When you’re completed, adjust the fluid travel with the spherical nut. Drive the cart again slowly and hit the brake hard and quick another 10 times. Check that the fluid free travel doesn’t change during braking. If it does, keep adjusting the spherical nut and repeating the test. Be sure that the clevis pins at the end of the brake cables and brake levers have some slack too.
Correct as required.
Brake Drum Removal and Installation
Remove
- Take off the dust cap,
- Remove the cotter pin and loosen and remove the castle nut.
- Remove the washer and slide the brake drum off the axle shaft.
- If the drum doesn’t come off, the brake shoes need some slack. Take some tension off the cable.
- Turn the hub such that the drum hole is at 6 o’clock, above the brake mechanism.
- Using a screwdriver, move the adjuster arm above the star wheel.
- Turn the star wheel to pull back on the brake shoes which should allow the brake drum to come off easily.
Install
- Clean the axle shaft and splines removing any dirt, grease and debris.
- Use WD-40 or an equivalent to prevent seizing on the axle spline.
- Fit the inner brake drum washer and brake drum in place.
- Check that brake drum nose is past the end of the axle splines. If not, use another washer to space out the drum.
- Install the castle nut and a new cotter pin.
- Torque the nut to 80-90ft. lbs. (108-122Nm), do not exceed 140 ft. lbs. (190Nm).
Wheel Brake Service
To service the wheel brake you need to disassemble and inspect it, lubricate all of the appropriate parts and then reassemble it. Any damaged, worn or corroded items should obviously be replaced.
- Remove the brake drum as per “Brake Drum Removal and Installation“
- Clean off any accumulated brake dust, and avoid breathing it in.
- Pull off the brake shoes.
- Clean the backing plate and dry it.
- Lubricate the area (3 bosses on each side) where the brake shoes come in contact with the backing plate.
- Lubricate the area in and around the slots and plastic slide plate.
- Refit the actuator assemblies, adjuster assemblies and the brake shoes.
- Refit the springs.
- Refit the brake drum.
- Adjust the brake pedal fluid travel.
Backing Plate and Entire Wheel Brake Assembly
Removal and Installation
- Take off the four bolts and locking nuts that fits the wheel brake backing plate to axle tube flange,
- Take off the clevis pin that fits the brake cable to brake lever,
- For reinstatement follow reverse points above. Locknut torque is 23-28ft. lbs. (31-38Nm).
Brake Shoe and Adjuster Replacement
- Take off the three brake shoe springs and toss them in the garbage.
- Keeping the shoe clamp pin in place, compress and turn the shoe clamp 90 degrees to remove it from the shoe clamp pin.
- Take off the brake shoes, adjusters and remaining components.
- Clean the backing plate and dry it
- Lubricate the area where the brake shoes contact the backing plate.
- Refit the adjuster mechanism.
- Fit the adjusting screw into the star wheel nut until about 2 threads are exposed.
- Replace both brake shoe assemblies on a common axle as a set and then fit the shoe clamp into the shoe clamp pin, turning it 90 degrees to lock it in place.
- Refit the new brake shoe and adjuster springs. The hooked end of spring is fitted into the front shoe. The other end of the spring is fitted to the adjuster.
- Adjust the brake pedal fluid travel.
Compensator Assembly, Removal and Installation
- Remove the compensator assembly from the brake pedal by disconnecting the cotter pin and the clevis pin.
- Slacken the locking nut and spherical nut that fits the compensator rod to the equalizer link.
- Take off the compensator assembly.
- Installation is the reverse of the above.
- Adjust the brake pedal fluid travel.
Brake Pedal Removal and Installation
- Remove the compensator assembly from the brake pedal by disconnecting the cotter pin and clevis pin.
- Disconnect the wiring harness where appropriate,
- Take off the torsion spring by levering it with a small screw driver between the hook and bracket.
- Take off the lock nut, shoulder bolt and disconnect the brake pedal.
- Check the shoulder bolt for any corrosion, and replace it if necessary.
- Installation is the reverse of the above. Lock nut torque is 25-29ft. lbs. (34-39Nm).
Parking Brake Catch Bracket Removal and Installation
- Take off the driver side front wheel to have free access to the brake pedal release mechanism.
- Take off the two bolts and nuts fitted to the catch bracket.
- Replace the catch bracket.
- Refit the nuts and bolts torquing them to 85-95 in. lbs. (10-11Nm).
Parking Brake Pedal, Removal and Installation
- Take off the push nut and pin and disconnect the parking brake pedal.
- To reinstall/connect, fit the parking brake pedal and torque the push nut and pin.
Pedal Bumper Adjustment
- Loosen the bumper lock nut and manipulate the bumper by turning it.
- The brake pedal shall come into contact with the pedal bumper when then pedal is released. The distance from the pedal arm to the setscrew heads in the kick-off cam is from ¼”-3/8” (6-9mm). Torque the lock nut to 12-14 ft. lbs. (16-19 Nm).
Parking Brake Release Linkage Removal and Replacement
- Disconnect the cotter pin, washers and bushings from the linkage rod, and take off the linkage rod.
- Check the bushings and replace them if necessary.
- Installation is the reverse of the above.
Parking Brake Kick-Off Cam Removal
Replacement and Installation
- Remove the parking brake release linkage.
- Loosen the two setscrews (5) from the cam (6) and take off the cam pivot (8), the cam and spacer (10).
- Check the bushings and the spacer. Replace if necessary.
- Installation is the reverse of the above,
- Torque the setscrews to 45-55 in. lbs. (5-6 Nm).